Turning an Amazon IoT button into something actually useful with (almost) no code
I’m pretty nuts for Amazon’s internet-of-things button. I’ve already made a Slack doorbell for my office and a push-to-order Sweetgreen button. But both of these projects required a fair amount of programming.
Why is this button interesting? Gooood question. I mean, you can’t do much with it, besides press it. But:
- It combined a mechanical sensor with built-in WiFi, in a package that costs $20. That’s actually pretty incredible. Even the cheapest DIY setup would easily clock in at $30 or more, and would mostly likely be a great deal more bulky.
-
It ties into Amazon’s Lambda service. A few years ago, to do anything on the internet, you had to rent a server. They weren’t necessarily expensive — Amazon’s been in the server game for a decade — but they could be knowledge-intensive. You still had to do all the annoying initializing/maintenance stuff that many coders didn’t care for.
Services like Lamda abstract this aaway — you pop in your code, and Amazon worries about the rest.
So it’s a pretty neat little button!
That said…
It’s not terribly useful if you don’t know how to program a computer. Amazon doesn’t hold your hand. You basically get a box to write code in, some weird parameters, and Lambda bids you good luck. For a novice, that’s pretty intimidating.

On the other end of the spectrum is IFTTT.com, an automation website that does a really good job of abstracting code into something easier to understand. The site (it stands for If This, Then That) links together completely separate services — Twitter, Hue lightbulbs, thermostats — and allows events from one to trigger actions in another.
Combinations that sound very complicated — hmm, can I send a 🙄 tweet whenever I receive an email from my crazy uncle? — become a matter of clicking and dragging various services together.

If only Amazon’s IoT service could be so intuitive…
But it can be!
It just takes a bit of boilerplate code, thanks to IFTTT’s Maker extension. Maker is sort of a general-purpose receiver, allowing people to trigger an action by sending a ping from an outside server through a humble POST request. (If you’re not familiar with HTTP protocol, a POST request is one of the four or five simplest messages servers use to talk to each other.)
Programmatically, sending an HTTP request is super easy — pretty much any server can do it. And since you can write code to send the POST message yourself, it frees you from needing a device that already has a partnership with IFTTT.
So you could have a motion detector, hooked up to a Raspberry Pi, that tells IFTTT to text you every time someone walks past your desk. Or a water sensor, also connected to a Raspberry Pi, that pings IFTTT every time the cat’s water bowl gets low. In both cases, the Pi would take care of sending the ping.
In this case, Amazon’s Lambda service will take the place of the Pi (remember, we don’t need servers anymore?), pinging IFTTT every time we press the IoT button. For this demonstration, I’m going to make my button do something simple: tweet “Man, it’s a hot one” from my Twitter account.
Setting up IFTTT
Let’s do the easy bit first: Making our Twitter IFTTT action.
- Head to IFTTT and make a new applet. (You’ll have to sign up for an account if you haven’t already.)
-
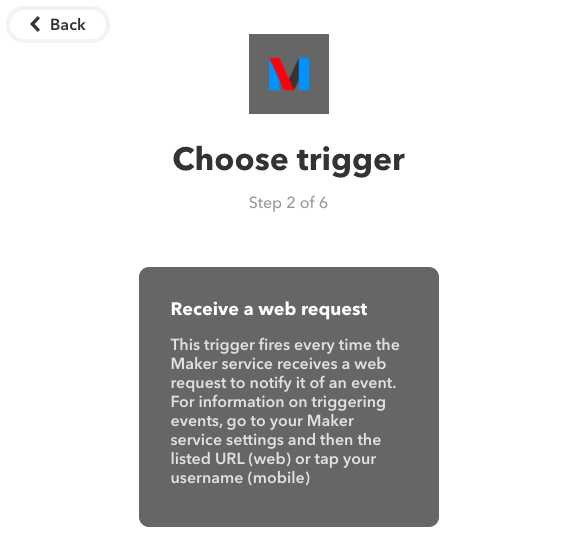
Click “+this” to make a new trigger. It’ll give a wide array of options, but filter for “Maker.”
-
Choose the “Recieve a web request” option. It’ll prompt you to give the trigger a name. I’m calling mine
santana-button-pressed. -
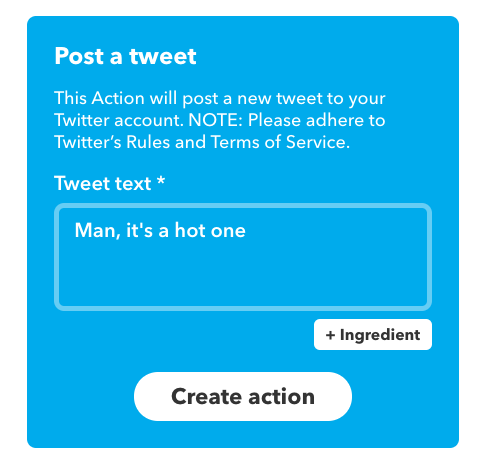
Now, we’ll choose the action: sending a tweet. Click “+that” and filter to Twitter, selecting “Post a tweet.”
-
Write your preferred tweet text. Here’s mine:
-
After I saved the applet, I had a bit of trouble finding the URL I was supposed to use to send a POST request to Maker. If you click “Maker” in the breadcrumb menu in the upper-left, and then click “Settings” on the main Maker page, you’ll get a URL under “Account info.” Following that takes you to your credential page. Whew!
Now you have the URL you’ll need to POST — a combination of your trigger name and your Maker key. For instance, mine starts
https://maker.ifttt.com/trigger/santana-button-pressed/with/key/(followed by my key). Save this!
Writing the Node code to upload to Lambda
Now, we have to write a simple script for Lambda that sends a POST request every time the button is pushed. The POST request itself doesn’t even have to contain any information — we’ve already told IFTTT what to tweet.
Here’s my walk-through in Node. (If you’re not interested, here’s the code you’ll need for the next part, when we upload our code to Lambda.)
-
Start a new project folder. We’ll use the requests module to send the POST ping, so install that using
npm install requests --save. -
Make a main file for your code —
index.jsworks fine. -
All Lambda Node scripts are written as modules, meaning we’ll have to encase our code in a function and include it as a
exportproperty. So let’s start off with this:exports.ifttt = function(event, context){ }Everything else will go inside here.
-
Now let’s import the request library and make the actual request.
  exports.ifttt = function(event, context){
    var request = require('request');
    request.post(process.env.IFTTT_KEY, function(err, res, body){
      if(err) throw err;
      console.log("Sent ping to IFTTT!");
    });
  }
Pretty simple. We make a POST request to our IFTTT endpoint, throw an error if one returns, and otherwise print that all is well. You’ll note that we don’t actually include the endpoint in the code — we’re telling Node to pull it from an environmental variable, which we’ll specify when we set up Lambda. This is better for security… you don’t wnat your private key floating around on Github.
Once you’ve got that written, select all the files (index.js, node_modules, etc.) and compress into a zip archive.
Setting up IoT button and uploading code to Lambda
I’m presuming that you’re staring at a new IoT button in your hand and wondering what to do. Skip ahead if you’ve already done some of these steps.
-
Log into https://aws.amazon.com Once there, select the “AWS IoT” service. Clicking “Connect” on the left rail will give you a new spread of menu options, one of which is “AWS IoT Button.”
-
Scroll down and click “Go to Configuration Wizard.” You’ll have to type in your serial number, which is printed on the back of the button. Make sure you click “Generate certificate and keys” before you move on! You’ll be given two files to download, and I don’t know how to get these otherwise. Also note the endpoint and region.
-
Also make sure you click “Enable trigger” before you click “Next.” Then (finally!) click “Next.”
-
We’re now at the “Configure function” section. Type
iftttinto Name, and write whatever description you’d like. Down at Lambda function code, change “Code entry type” to “Upload a .ZIP file.” You’ll then upload the zip archive we compressed a few steps ago.(Why aren’t we just copying-and-pasting our code? It’s that pesky requests library — the meat of it is included in the node_modules folder, so we need to include everything.)
-
Make sure you add an environmental variable, named
IFTTT_KEY, that lists the Maker URL you took from IFTTT. -
Lastly, give the button code a descriptive role name — I did
ifttt_button. Click “Next,” and then “Create function.” -
OK! Your code should be uploaded. Only thing left to do is connect your IoT button to your home or office WiFi. Amazon has a pretty good set of directions here, so I’ll let them explain. Just remember that you’ll need those credentials you downloaded earlier! (And if you missed them, you’ll find your endpoint by clicking “Settngs” at the AWS IoT console.)
Give it a shot. Boom!
Man, it’s a hot one— Andrew McGill (@andrewmcgill) December 19, 2016
The button will now do your bidding.
Final notes
You can obviously set up your IFTTT account to do whatever you want, which is the beauty of this hack. I will note that I had a tough time getting my button to connect to my apartment WiFi until I realized it only can communicate with 2.4 GHz networks. If you’re running into connectivity issues (hint: the button’s LED will flash red three times), try poking around in your router settings.
Other than that, happy button-pushing!