Make Every Week, Part 4: Ordering a Sweetgreen salad at the press of a button
Eesh! So far, #MakeEveryWeek has been more like #MakeEveryThreeWeeks. My apologies. Sometimes the making is a lot easier than the blogging.
This week’s projects focuses on a (sort of) healthy addiction of mine: salads from Sweetgreen, a restaurant chain from D.C. that serves up a mean quinoa-and-kale. Though technically fast food, Sweetgreen doesn’t feel or taste like your regular rushed-lunch fare. It’s my go-to place to pick up lunch if I didn’t bring left overs from home, and it doesn’t hurt that their Foggy Bottom location is a nice walk from The Atlantic’s offices.
But a lot of people feel the same way. The line around noon can get verrrrry long.
Unknowingly showed up to sweetgreen in the middle of lunch hour. Now I’m stuck in this long ass line.— Sextina Aquafina (@yosoymichael) August 15, 2016
There was barely anyone in line today at @sweetgreen. #SignOfTheApocalypse— Heather Benjamin (@Heather_Benj) August 12, 2016
One remedy to this is Sweetgreen’s online ordering system, which signals the kitchen to make a salad at a certain time and leave it on a shelf for pick-up. That way, you can pop in, grab and leave, instead of waiting for the salad to be made in front of you.
Last week, I got my second Amazon IoT button—they’re finally back in stock. Then the thought struck me. Is there a way to hook into Sweetgreen’s ordering system and buy a salad with a simple button press? Could my dream of seamless, on-demand salad delivery come true? Granted, if I had such a device, I’d probably spend entirely too much on salads. But it was too neat of an idea to pass up.
Since Sweetgreen doesn’t publish a documented ordering API (and who does?), I had to dive deep into the network traffic of the average salad order.
Figuring out how Sweetgreen works
To complete a Sweetgreen transaction, I need to:
- log in using my email and password, saving the resulting cookie;
- add a salad to my shopping bag;
- complete the order with my credit card information.
Fortunately, Sweetgreen has a relatively simple (though undocumented) API, accessible through https://order.sweetgreen.com/api/. After poking around the website (and adding/removing quite a few salads from my shopping bag), it looks like this is the workflow I’ll have to follow:
- Send a
POSTrequest tohttps://order.sweetgreen.com/api/customers/login_or_registerwith my username and password; - Add the salad to my bag with a
POSTrequest tohttps://order.sweetgreen.com/api/line_items, along with a JSON object describing the order; - Get the “order” JSON by sending a
GETrequest tohttps://order.sweetgreen.com/api/session, saving theorderobject and my billing information; - Send a
PUTrequest tohttps://order.sweetgreen.com/api/orders/[order id], packaging my combined order+billing object.
I’m writing this code in Node.js using the request module, so I’m going to start off my script by including the library and setting up the jar where I’ll store the session cookie (so my authentication will stick once I log in.)
var request = require('request');
var cookies = request.jar();
var request = request.defaults({jar: cookies})
Next up, I’ll log in with my Sweetgreen credentials.
// Log in
request.post({
  url: "https://order.sweetgreen.com/api/customers/login_or_register",
  form:{
    customer: {email: INSERT_SWEETGREEN_EMAIL, password: INSERT_SWEETGREEN_PASSWORD}
  }
}, function(err, response, body){
  if(err) throw err;
  // Rest of code goes here
})
That call returns a massive JSON object, holding previous orders, current shopping status, and billing account info. Since the final package I send to Sweetgreen to complete the order needs some of this account info, I’m going to grab it now.
var session = JSON.parse(body);
var contact_number = session.customers[0].contact_number
var billing_account_id = session.customers[0].billing_account_ids[0]
var billing_account = session.billing_accounts[0];
We’re now set to add salads to my shopping bag.
Adding items and completing the order
Each salad object is actually pretty simple. At its most basic, it just needs a quantity, a product_id and a restaurant_id. The Foggy Bottom ID is 6, so I’ll use that for every order. Here’s the object for a Harvest Bowl:
var harvest_bowl = {
  line_item: {
    quantity: 1,
    product_id: "139",
    restaurant_id: "6"
  }
}
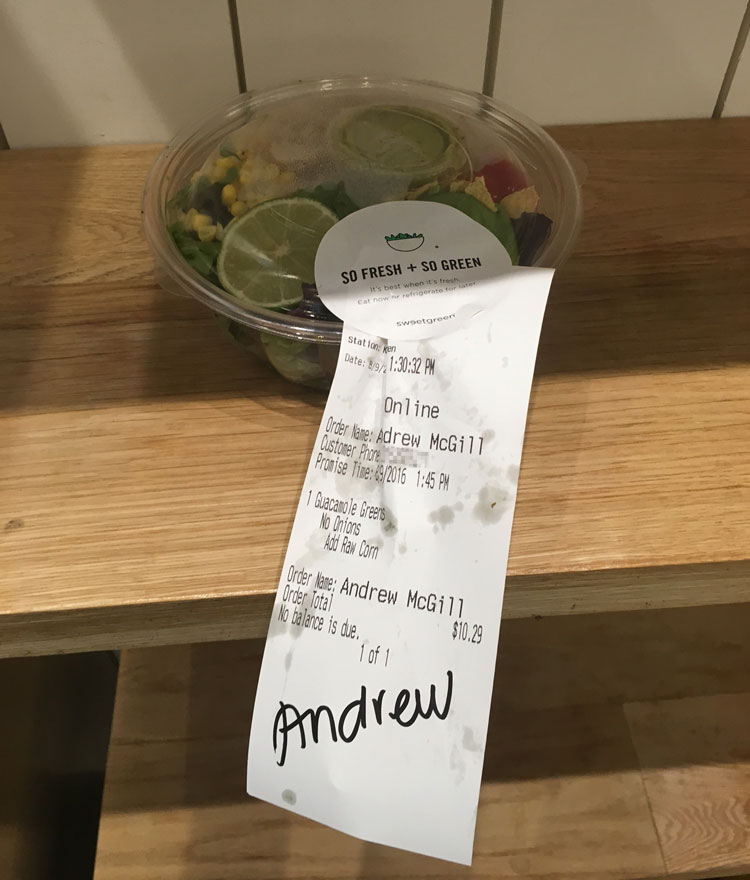
But! Things get more complicated if you want to modify a base recipe. For example, I love the Guacamole Greens salad—but only if I can replace the red onion with corn. In the API, you need to drop these changes as a series of options objects. Here’s an object for my modded recipe, pulled with some slight modifications from the network traffic.
var guac_greens = {
  line_item:{
    quantity:"1",
    custom_name:"andrew's special guac with no onions success",
    product_id:"134",
    options:[{
      id:"13929",
      name:"remove red onion",
      out_of_stock:false,
      quantity:"1",
      parent_option_group_id:"973",
      option_group_ids:["975"],
      ingredient_id:"64",
    },
    {
      id:"13941",
      name:"sub raw corn",
      out_of_stock:false,
      quantity:"1",
      parent_option_group_id:"975",
      option_group_ids:[],
      ingredient_id:"61",
      line_item_id:null
    }],
    restaurant_id:"6"
  }
};
Constructing that object is the hard part, but adding it to the shopping bag is pretty easy. Here comes another POST request:
request.post({
  url: "https://order.sweetgreen.com/api/line_items",
  body: guac_greens,
  json: true
}, function(err, response, body){
  if(err) throw err;
  var order_id = body.line_item.ignored_order_id
});
Notice how I saved the order ID? That’s because I’ll need it very shortly to complete the transaction. But first, I’ve got to construct the final order object. Turns out that’s basically a copy of the object you get by calling the /session endpoint, along with some additional billing info and other ordering ephemera. After some trial and error, I figured out it was easiest to make a call to the /session endpoint, grab the array of orders, filter it down to the latest order and tack on the required miscellaneous info.
// Get final order
request.get("https://order.sweetgreen.com/api/session", function(err, response, body){

  // Grab latest order object
  var orders = JSON.parse(body).orders;
  var order = orders.filter(function(d){ return d.id == order_id })[0];

  // Append billing stuff and give
  order.contact_number = contact_number;
  order.billing_account_id = billing_account_id;
  order.wanted_time = order.available_wanted_times_tuples[0].original
  order.state = "complete";
  order.billing_account = billing_account;
});
After that, all you need is a PUT request referencing the order_id and you’re good to go:
request.put({
  url: "https://order.sweetgreen.com/api/orders/" + order_id,
  body: { order: order },
  json: true
}, function(err, response, body){
  if(err) throw err;
  console.log("did it!")
});
Sweetgreen helpfully sends an email after you post an order, so you’ll know when your order goes through.
Boom! Salad en route
I had to make some slight modifications to the code to get it ready for AWS Lambda, the service powering the IoT button, but it was otherwise pretty much ready to go. I also wrote a quick function that randomly chooses one of three salads to order, so I have a bit of variety. The full code is here.
Here’s the button posted above my desk at work: